Description:
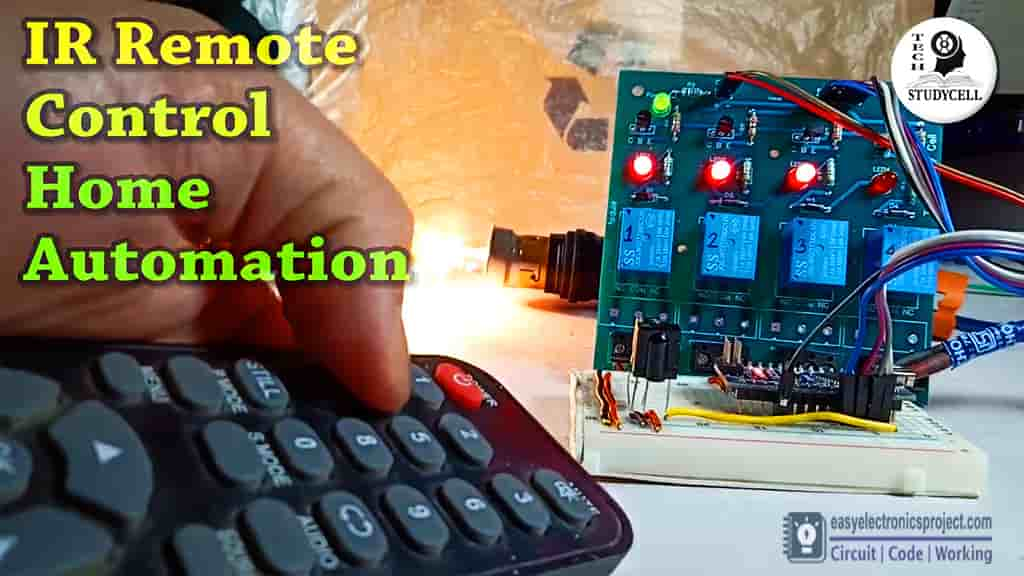
In this Arduino project, we will make a circuit that can control room light, fan from IR remote. Here I have explained how to make the remote control light circuit with details. So if you follow all the steps you can design this home automation project easily.
Arduino IR Remote Circuit:
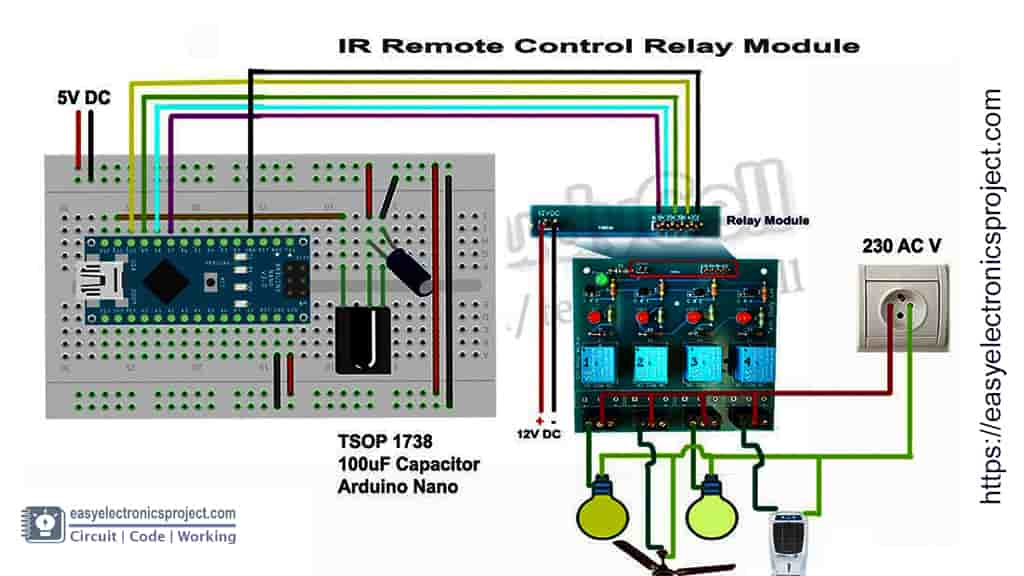
In this circuit, I have used Arduino Nano, But you can also use Arduino UNO for this project.
Components Required:

- TSOP 1738 IR Receiver
- 100uF Capacitor
- Arduino Nano
- Relay Module (5V)
- Breadboard
Tutorial video for Arduino IR remote control Relay
In this video, I have explained all the steps to control the relay module with the Arduino infrared control circuit. So I will highly recommend watching the complete video for better understanding.
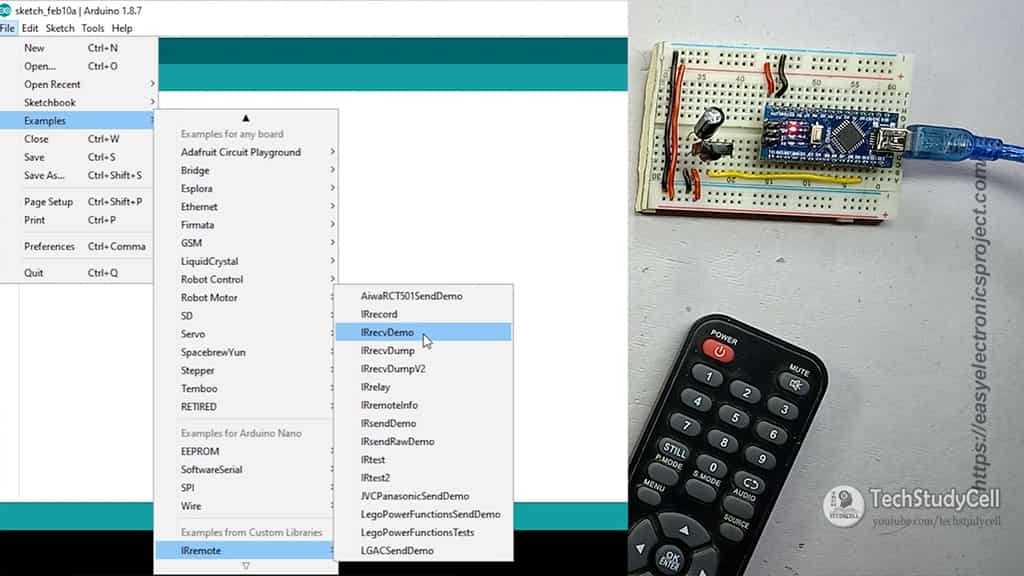
Download the IR Remote Library:
First, connect the 1738 IR Receiver with Arduino Nano (pin D11) as per the circuit diagram.
Then connect the Arduino with the laptop and open Arduino IDE.
Download and install the IRremote (by shirriff) library from Manage Library or Click here to Download the library
Then go to File –> Examples –> IRremote –> IRrecvDemo and open the sketch.
Now, upload the sketch to Arduino.
Get the Hex Code:
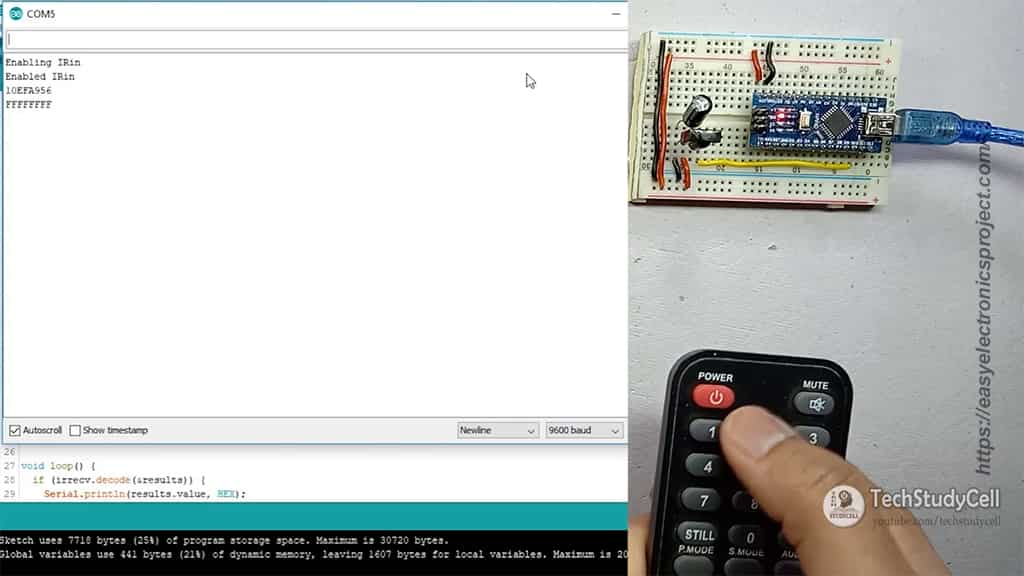
Open the Serial Monitor with Baud Rate 9600.
Now, if I press any button of the IR remote then related Hex code will populate on the serial monitor. I need this Hex code to control the relay module from the IR remote. So copy all the hex codes of the buttons that you will use in the project.
Arduino Sketch for this project:
I have already explained the code in the tutorial video. As you can see in the code I have used those Hex codes to control the relay module. Here, I have used 1, 2, 3, 4 buttons of a TV remote, but you can use any buttons of the IR remote, just get the Hex code of the button which you want to use.
#include <IRremote.h>
//Define PIN constant
const int switch_1 = 7;
const int switch_2 = 8;
const int switch_3 = 9;
const int switch_4 = 10;
int RECV_PIN = 11;

int toggleState_1 = 0; //Define integer to remember the toggle state for switch 1
int toggleState_2 = 0; //Define integer to remember the toggle state for switch 2
int toggleState_3 = 0; //Define integer to remember the toggle state for switch 3
int toggleState_4 = 0; //Define integer to remember the toggle state for switch 4

//Define IR receiver and Result Objects
IRrecv irrecv(RECV_PIN);
decode_results results;

void setup()
{
  Serial.begin(9600);
  irrecv.enableIRIn(); // Enable the IR receiver
   pinMode(switch_1, OUTPUT);
   pinMode(switch_2, OUTPUT);
   pinMode(switch_3, OUTPUT);
   pinMode(switch_4, OUTPUT);
}
void loop() {
  if (irrecv.decode(&results)) {

    switch(results.value){
      case 0x10EFA956:        // 10EFA956 = Hex code for IR remote button 1 (change this)
                if(toggleState_1 == 0){
                  digitalWrite(switch_1, HIGH); // turn on switch 1
                  toggleState_1 = 1;
                  }
                else{
                  digitalWrite(switch_1, LOW); // turn off switch 1
                  toggleState_1 = 0;
                  }
                  delay(100);
      break;
      case 0x10EF9966:          // 10EF9966 = Hex code for IR remote button 2 (change this)
                if(toggleState_2 == 0){
                  digitalWrite(switch_2, HIGH); // turn on switch 2
                  toggleState_2 = 1;
                  }
                else{
                  digitalWrite(switch_2, LOW); // turn off switch 2
                  toggleState_2 = 0;
                  }
                  delay(100);
      break;
      case 0x10EFB946: //(change this)
                if(toggleState_3 == 0){
                  digitalWrite(switch_3, HIGH); // turn on switch 3
                  toggleState_3 = 1;
                  }
                else{
                  digitalWrite(switch_3, LOW); // turn off switch 3
                  toggleState_3 = 0;
                  }
                  delay(100);
      break;
      case 0x10EF6B94: //(change this)
                if(toggleState_4 == 0){
                  digitalWrite(switch_4, HIGH); // turn on switch 4
                  toggleState_4 = 1;
                  }
                else{
                  digitalWrite(switch_4, LOW); // turn off switch 4
                  toggleState_4 = 0;
                  }
                  delay(100);
      break;
      default : break;
      }
    irrecv.resume(); // Receive the next value
  }
}
Connect the Relay Module:
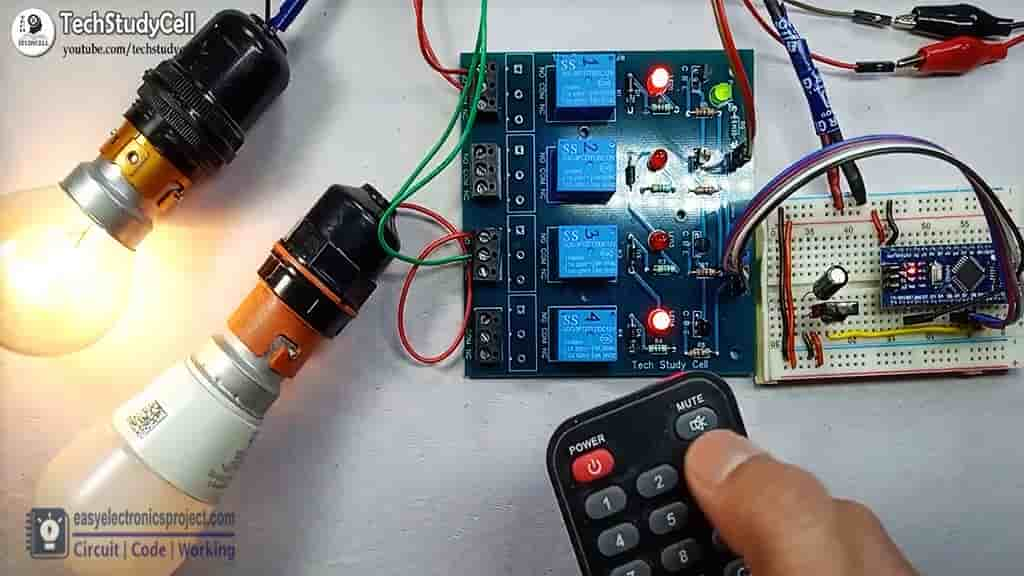
Now, connect the relay module as per the circuit diagram. and turn on the power supply. Please take proper safety precautions while using high voltage.
As per the sketch, if I press “1” on the remote the relay-1 will turn on, and then if I press the “1” button again the relay-1 will turn off. Like that, I can control other relays with the respective remote buttons.
Click Here to explore more such Arduino Projects.
You can also subscribe to our newsletter to receive more such useful electronics projects through email.
Please do share your feedback on this Arduino project. Thank you for your time.
